
一発当たり、しかも金。2本目狙おうかな…と欲張ると当たらないコース。
[2020/3/2 追記] 最終結果、銀1本、金3本、打率5割。こんなの絶対におかしいよ!
2020/1/19

一発当たり、しかも金。2本目狙おうかな…と欲張ると当たらないコース。
[2020/3/2 追記] 最終結果、銀1本、金3本、打率5割。こんなの絶対におかしいよ!
— posted by mu at 12:59 pm
![]() Comment [0]
Comment [0]
![]() TrackBack [0]
TrackBack [0]
2019/12/19
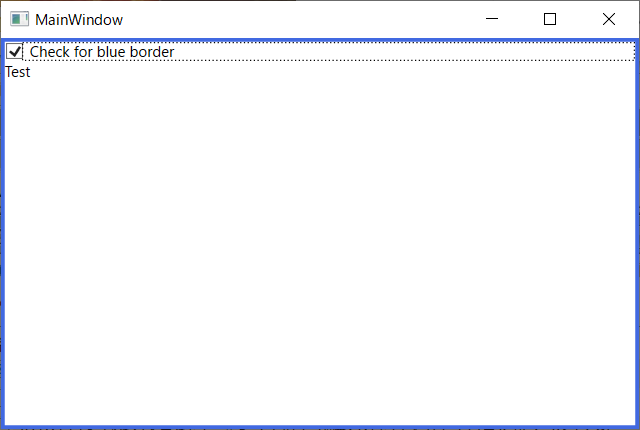
こういうXAMLを書けば普通に動きます。今回の件でStackPanelは必要ないのですが、CheckBoxだけBorderで囲むなんて実用的じゃないですのでオマケ。
<Border>
    <Border.Style>
        <Style TargetType="{x:Type Border}">
            <Setter Property="BorderBrush" Value="Gray"/>
            <Setter Property="BorderThickness" Value="1"/>
            <Style.Triggers>
                <DataTrigger Binding="{Binding IsChecked,ElementName=checkbox1}" Value="true">
                    <Setter Property="BorderBrush" Value="RoyalBlue"/>
                    <Setter Property="BorderThickness" Value="3"/>
                </DataTrigger>
            </Style.Triggers>
        </Style>
    </Border.Style>
    <StackPanel>
        <CheckBox Name="checkbox1" IsChecked="False" Content="Check for blue border"/>
        <TextBlock Text="Test"/>
    </StackPanel>
</Border>
ただこれの難点は内部のチェックボックスに固有の名前を与えているのでこういうのを作るたびにElementNameを変えたStyleを書く必要があり、メンテナンス性が悪いことです。Styleをリソースで定義して使いまわしたいわけです。子要素から親要素へのBindingはFindAncestorを使えばいいですが逆はどうするかというと、BorderのプロパティChildが内部のStackPanelを指しそれのプロパティChildren[0]がStackPanelの第1子要素CheckBoxを指してくれますので、Bindingパス Child.Children[0].IsCheckedで得られます。
ここからが本題。下記XAMLはうまく動きません。
<Window.Resources>
    <Style x:Key="BorderStyle1" TargetType="{x:Type Border}">
        <Setter Property="BorderBrush" Value="Gray"/>
        <Setter Property="BorderThickness" Value="1"/>
        <Style.Triggers>
            <DataTrigger Binding="{Binding Child.Children[0].IsChecked}" Value="true">
                <Setter Property="BorderBrush" Value="RoyalBlue"/>
                <Setter Property="BorderThickness" Value="3"/>
            </DataTrigger>
        </Style.Triggers>
    </Style>
</Window.Resources>
<Border Style="{StaticResource BorderStyle1}">
    <StackPanel>
        <CheckBox Name="checkbox1" IsChecked="False" Content="Check for blue border"/>
        <TextBlock Text="Test"/>
    </StackPanel>
</Border>
理由はXAMLは上から処理されていくから。BorderのStyle={StaticResource...}の部分でBindingパスを解決しようとするのですが、XAML内では後に書いてある子要素のStackPanelやCheckBoxはまだ処理されておらずオブジェクトとして存在してません。つまりBorderのChildはまだnullなのです。ElementNameの場合はXAML上で後ろの物でもちゃんと探してくれるのですが、こちらはダメのようです。
ならばStyleの設定をXAML上で後に書けばいいのです。というわけで、以下のXAMLは動きます。
<Window.Resources>
    <Style x:Key="BorderStyle1" TargetType="{x:Type Border}">
        <Setter Property="BorderBrush" Value="Gray"/>
        <Setter Property="BorderThickness" Value="1"/>
        <Style.Triggers>
            <DataTrigger Binding="{Binding Child.Children[0].IsChecked,RelativeSource={RelativeSource Self}}" Value="true">
                <Setter Property="BorderBrush" Value="RoyalBlue"/>
                <Setter Property="BorderThickness" Value="3"/>
            </DataTrigger>
        </Style.Triggers>
    </Style>
</Window.Resources>
<Border>
    <StackPanel>
        <CheckBox Name="checkbox1" IsChecked="False" Content="Check for blue border"/>
        <TextBlock Text="Test"/>
    </StackPanel>
    <Border.Style>
        <Style TargetType="{x:Type Border}" BasedOn="{StaticResource BorderStyle1}"/>
    </Border.Style>
</Border>
注意すべき点があります。
— posted by mu at 01:21 am
![]() Comment [0]
Comment [0]
![]() TrackBack [0]
TrackBack [0]
2019/12/15
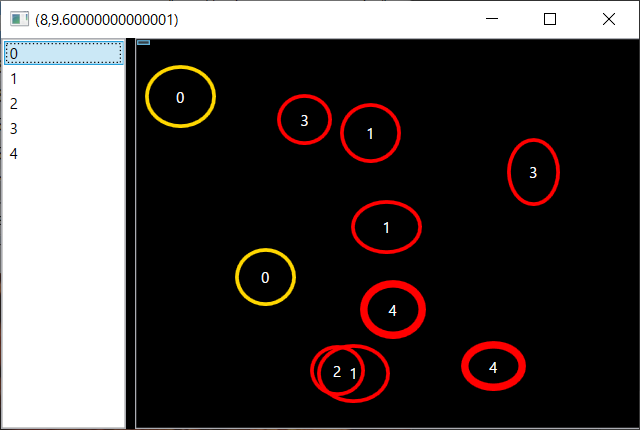
地図などを背景にして、印を上に書き加えることを想定してます。データはグループ(Group)配列とそれぞれに位置データ(Spot)配列の階層構造になってます。例えばグループとして、レストラン・コンビニなどの業種、Spotとしては店の位置とその規模を円の大きさで示すなど。あとエスコンのレーダーかいくぐりミッションとか
コードは以下のことができます。
左はいたって普通のListBoxですが、右もListBoxです。ListBoxをカスタマイズするにしても通常ItemsPanelにはStackPanelやWrapPanelを指定するでしょうが、ここではCanvasを使うことで自由な位置への配置を可能にします。その代わり位置を指定しないと全部左上に重なってしまうので、ItemContainerStyleでCanvas.LeftとCanvas.Top添付プロパティを設定します。
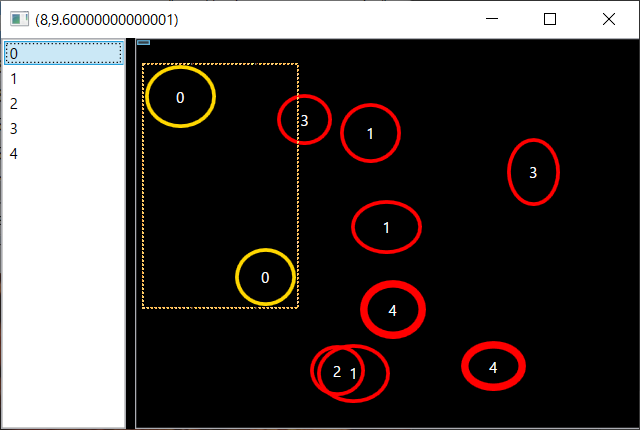
同一グループ内の複数の円を描くにはItemsControlを使用。ItemsControlはListBoxの親クラスです。ListBoxを使用すると同一グループ内の個々の円に対する選択が発生してしまうのでこちらを使用してますが、用途によってはListBoxでも可。つまりListBoxの中にListBoxを使っていることになります。下の図でいえば、左のListBoxで選択状態にある"0"に相当するのが、右の黄色箱で囲んだ部分になります。左右とも同じデータをバインディングしたListBox、描画方法が違うだけ。
左右で選択が連携するのは簡単、左のSelectedItemを右のSelectedItemにTwoWayでバインドするだけ。下図の黄色箱どこでもクリックすれば左のListBoxの0の行をクリックしたのと同じはずですが、黄色箱のItemsPanelとなっているCanvasはマウスイベントを拾わないので、円内部だけがクリックに反応します。
無理やりな部分があまりないので転用しやすいと思います。これだけのことがXAMLだけで実現できてしまうとは、面白い技術だなと。
<Window x:Class="RxMouseDragTest.MainWindow"
        xmlns="http://schemas.microsoft.com/winfx/2006/xaml/presentation"
        xmlns:x="http://schemas.microsoft.com/winfx/2006/xaml"
        Title="MainWindow" Height="350" Width="525">
    <Window.Resources>
        <DataTemplate x:Key="GroupListItemTemplate">
            <TextBlock Text="{Binding GroupNumber}"/>
        </DataTemplate>

        <DataTemplate x:Key="SpotTemplate">
            <Grid>
                <TextBlock Text="{Binding Number}" HorizontalAlignment="Center" VerticalAlignment="Center" Foreground="White"/>
                <Ellipse Width="{Binding Width}" Height="{Binding Height}" Fill="Transparent">
                    <Ellipse.Style>
                        <Style TargetType="{x:Type Ellipse}">
                            <Setter Property="Stroke" Value="Red"/>
                            <Setter Property="StrokeThickness" Value="3"/>
                            <Style.Triggers>
                                <DataTrigger Binding="{Binding IsSelected,RelativeSource={RelativeSource Mode=FindAncestor,AncestorType=ContentControl}}" Value="true">
                                    <Setter Property="Stroke" Value="Gold"/>
                                </DataTrigger>
                                <DataTrigger Binding="{Binding IsMouseOver,RelativeSource={RelativeSource Mode=FindAncestor,AncestorType=ContentControl}}" Value="true">
                                    <Setter Property="StrokeThickness" Value="6"/>
                                </DataTrigger>
                            </Style.Triggers>
                        </Style>
                    </Ellipse.Style>
                </Ellipse>
            </Grid>
        </DataTemplate>
        <Style x:Key="SpotContainerStyle" TargetType="{x:Type ContentPresenter}">
            <Setter Property="Canvas.Left" Value="{Binding Left}"/>
            <Setter Property="Canvas.Top" Value="{Binding Top}"/>
        </Style>

        <ItemsPanelTemplate x:Key="GroupPanelTemplate">
            <Canvas Background="Transparent"/>
        </ItemsPanelTemplate>
        <DataTemplate x:Key="GroupTemplate">
            <ItemsControl
                ItemsSource="{Binding Spots}"
                ItemTemplate="{StaticResource SpotTemplate}"
                ItemContainerStyle="{StaticResource SpotContainerStyle}">
                <ItemsControl.ItemsPanel>
                    <ItemsPanelTemplate>
                        <Canvas/>
                    </ItemsPanelTemplate>
                </ItemsControl.ItemsPanel>
            </ItemsControl>
        </DataTemplate>
    </Window.Resources>

    <Grid Background="Black" ClipToBounds="True">
        <Grid.ColumnDefinitions>
            <ColumnDefinition Width="100"/>
            <ColumnDefinition/>
        </Grid.ColumnDefinitions>
        <ListBox Name="GroupList" Grid.Column="0" ItemsSource="{Binding Groups}" ItemTemplate="{StaticResource GroupListItemTemplate}"/>
        <ListBox
            Name="ChartBase"
            Grid.Column="1"
            ItemsPanel="{StaticResource GroupPanelTemplate}"
            ItemTemplate="{StaticResource GroupTemplate}"
            ItemsSource="{Binding Groups}"
            SelectedItem="{Binding SelectedItem,ElementName=GroupList}"
            Background="{x:Null}">
        </ListBox>
    </Grid>
</Window>
コード。DataContextをセットしているだけです。
public partial class MainWindow : Window
{
    static readonly Random rnd = new Random();

    public MainWindow()
    {
        InitializeComponent();

        DataContext = new
        {
            Groups = Enumerable.Range(0, 5).Select(i => new SpotGroup(i, rnd.Next(1, 4))),
        };
    }
}

public class SpotGroup
{
    public int GroupNumber { get; private set; }
    public IEnumerable<Spot> Spots { get; private set; }

    public SpotGroup(int GroupNumber, int NumItems)
    {
        this.GroupNumber = GroupNumber;
        Spots =
            Enumerable.Range(0, NumItems)
            .Select(i => new Spot() { Number = GroupNumber })
            .ToArray();
    }
}

public class Spot
{
    static readonly Random rnd = new Random();

    public int Number { get; set; }
    public int Left { get; private set; }
    public int Top { get; private set; }
    public int Width { get; private set; }
    public int Height { get; private set; }

    public Spot()
    {
        Left = rnd.Next(0, 300);
        Top = rnd.Next(0, 250);
        Width = rnd.Next(0, 20) + 40;
        Height = rnd.Next(0, 20) + 40;
    }
}
— posted by mu at 09:34 pm
![]() Comment [0]
Comment [0]
![]() TrackBack [0]
TrackBack [0]
2019/12/8

トミカプレミアム 28番 F-35A戦闘機。東京モーターショーのイメージもあってか、店で見かけたこれがトミカと名乗っていることに感じる所があり購入。この品質で750円程度は安いと思うのは私が大人になってしまったからでしょう。
F-16/F-2もですが単発機は胴体が厚ぼったくなってしまい、見る方向によっては不格好に感じる。ラインナップで軍用機は自衛隊機に限っているようなので望み薄ですが、ここはF-22Aを製品化していただきたい。
— posted by mu at 11:52 pm
![]() Comment [0]
Comment [0]
![]() TrackBack [0]
TrackBack [0]
2019/6/29
前回![]() の続き。数時間後にまたDisk fullで不具合。MySQL以外のプログラムでもDisk fullが出たのでMySQL固有の問題ではなさそう。
の続き。数時間後にまたDisk fullで不具合。MySQL以外のプログラムでもDisk fullが出たのでMySQL固有の問題ではなさそう。
このマシン、ドライブの構成は以下のようになってました。
C:¥ (NTFS)
+- ProgramData
   +- MySQL
      +- 10TBの別Volume (ReFS)
記憶域プールで作成した10TBのReFSドライブにはドライブレターを割り当てず、C:¥ProgramData¥MySQLにマウントしてました。
コマンドラインや記憶域プールマネージャーで見る限りReFSドライブにはまだ8TB以上空きがありますが、複数のプログラムでDisk fullエラーが出ている以上、Windowsが空き容量を誤認している可能性が高い。NTFSへのReFSのマウント、あまりメジャーでない構成を使ったのがいけなかったか。
というわけで、ReFSのC:¥ProgramData¥MySQLマウントは解除、ドライブレターを与えJunctionでつないで様子見することに。今度は解決してほしいなと。
ちなみにOSはWindows Server 2016 (1607)です。
[2019/7/1] Windowsバージョン訂正
[2019/7/2] ダメでした
[2019/7/3] 記憶域プールから別のディスク作って、MySQL止めて、データ全コピ。とりあえず問題起こした仮想ディスクは残しておいて…調べる暇ないだろうな(^ ^;)
— posted by mu at 12:13 pm
![]() Comment [0]
Comment [0]
![]() TrackBack [0]
TrackBack [0]
Comments